23 October 2013

Surface Design Competition

This month i am taking part in a surface design competition for a famous ceramics company. There are only a handful of people from my university who have put ourselves forward but i know there is so much talent and i would be proud if one of us won!! Of course i would love to win - but it would just be awesome to have this in my portfolio.

We are currently in the photoshop stage. The competition only requires you to submit a jpeg, but we are going to create ceramic transfers and create our own actual plates/bowls/mugs which i think is awesome. You can also create complimentary accessories, so thankyou to everyone who took my recent survey, as i have chosen the three top accessories. These will be printed and made. Again, not to be submitted but looking great in the portfolio, and the tutors are happy to mark it as park of our practical degree work.

Here are my initial designs. you must stay true to your design values so of course im using ink lines that arnt quite straight,and offset colour! I havnt included the entire design as we havnt submitted them yet - you never know who is googling!

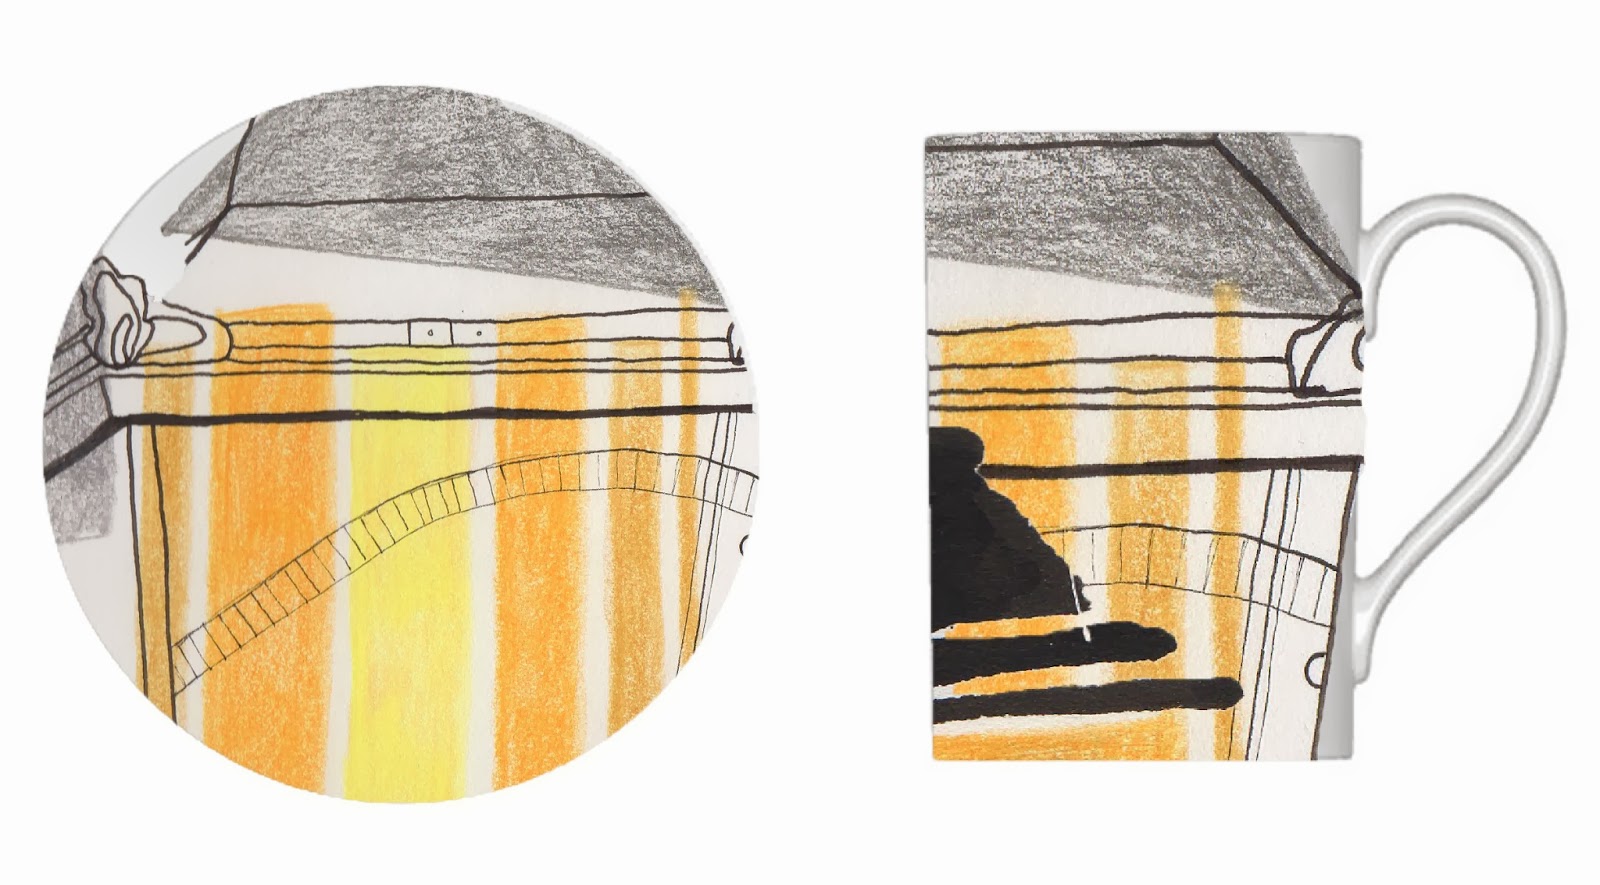
Mug & Small plate from my favourite collection so far.


colours!

Rhea Clements Design Intern - kinda!

This week - and hopefully every week after this - i am helping Rhea Clements, a local Nottingham based designer, in her home studio. She produces bright and bold knitwear her huuuuge and quite scary knitting machine! She products bags, fashion scarves, gloves, jewellery and much more! Its all really nice and properly made - so im proud to be helping!

We are in the middle of talks for a new photoshoot to promote some products. We have a few locations and 'set designs'  in mind but one idea which will involve natural wool and paint - im excited to get started! Ive thrown a few of my own ideas around and luckily Rhea is really open to suggestions and loves my ideas!

Here is a photo i took today of the table we were working at - so much colour in this room its crazy!


Happy little intern :)

19 October 2013

Gold Lanterns

One of the things i loved the most about Edinburgh is their use of little lanterns. These could be modernised streetlamps, with solar panals and LED bulbs, but no, they keep it old school with these lovely little lamps. they were everywhere and came in all shapes and sizes. The most quirky ones were down alleyways, as the alleys have been extended to include business' over the years, and if you look down a really long one you can see batches of different lantern designs :)

This evenings i have been bondawebbing some basic lantern detail and using this lovely material i found yesterday. Its called Gold Microdot, and the gold and black theme will run throughout this project, as i think it reflects Edinburgh Royal Mile & Castle Hill so well!


using my handwriting again in my work

Gold!

You can really see the gold that well here :(
Some more experiments coming soon! Need to get into the print room!

NoticeBoard DIY

Today i decide to create a basic noticeboard for my uni room. i have so many pieces of paper and notes everywhere that i need a place to store them!

I have made a few of these before, but only A3 size at the biggest. This one is A1 - 80cmx60cm (ish) so its pretty big!

I have a small uni room so i didnt want to get a big bold print. Just like the clutch bag sizing rule, a big noticeboard makes your room look even smaller, so i went for calico. I know most people turn their noses up at calico, and yes i used it from my stash which i make mock ups with, but i have a bit of a thing for calico at the moment.. its plain.. when im trying to think of designs this pin board wont confuse me.. i just sits on the wall subtlety :D Plus its going to get really colourful once i start stuffing bits of paper into it!

I chose grosgrain ribbon in white, to match the walls, and give the product a bit of texture. also the polyester ribbon can look abit tacky, especially with something as plain as calico! Then i got these lush natural wooden buttons from my local fabric store in felixstowe.

I also used command strips to attach it to my wall. I sometimes put a ribbon to hang it from then hammer a nail into the wall but i want all of my deposit back when we leave here in 7 months!

Im pretty happy with this! Might write a small tutorial. They are so easy and it only took me 45 minutes. 3M Craft Mount is also my new best friend :)

If i can do it then you can too :D


Tutorial will be written up for this one i think! So easy - and gets your papers off your desk :D


18 October 2013

Samples Samples Samples

This evening i am drawing a few things in my sketchbook and thinking about materials. there is nothing i love more than a fabric delivery, and even though these are just samples, it does get me excited! Though, i spent £10 at Merchant & Mills and got what can only be described as 'scraps'. The fabric itself is good value once youre on there though, so hopefully there's enough there to get some little prints onto.


Drawing inspired by the glass roof of the Edinburgh Waverly Train Station. At a certain time of the evening one side is in darkness and the other reflects the sunset.

This beautiful offcut is actually the selvedge of Harris Tweed fabrics. I love it because im going to be using some Harris Tweed, but this is such a lovely eco-friendly way to re-use what would otherwise be scrap. That is, if i get round to doing something with it!

My samples. they look quite big here but they are about 3cmx10cm

Love the packaging. LOVE the packaging. I have 100 of these bags at home.. Hmmmm might be nice to print up for some up and coming craft fairs hey!


I want to print onto wool this term which i am very excited about. Im looking into the properties of Oilskin. i was sort of hoping my sample would give me a bit of a better feel of the material but perhaps i need to buy a meter. clever that!

17 October 2013

Teaching Bee

This evening i whopped out my sewing machine for the first time since i have been at uni this year.. and it wasnt for me! My friend Bee wanted me to show her how to make a leather pouch, as a birthday present for her mum. And as its me, we had to do it properly! 
Many people on our course have made lovely leather pouches but they didnt have a lining, which is great for beginners but i like to throw my 'students' in at the deep end. Its how i was taught and at the end you have major satisfaction that youve made something so awesome all in one day!

The leather pouch was created from leather scraps, Amy Butler cotton, a jeans zip and we also made a little tag for the side. Naturally, it was a bee. Bee used my bamboo tablet to create her little bee and we had it printed and ironed in in no time :D I do this everyday for my little business but she was super impressed!

Here are some photographs..

We used wonderclips to keep everything lined up! This part was where we sewed the leather and the lining to the zip.

happiness is a handmade leather pouch!


The Amy Butler lining choice. i think it goes really well :)
YAY! This has made me realise how much i love my sewing machine.. i really need to get some toiles made! 

3 October 2013

Final Year Student!

I am a final year student. I AM A FINAL YEAR STUDENT! We even have the date for our graduation. its too real!

anyway - im attempting to get stuck... whilst everyone else is at secret tinie tempa gigs at the new Students Union, im sat here painting colour palettes from my trip to Edinburgh!


Contextual Research File Started..

Back in Bon.. love this place!

colour applied to acrylic paper, ready to cut out and create a range of palettes!

Using my new Bamboo tablet in my final year work. This will be brilliant for creating hand-drawn templates on photoshop. Last year i drew everything, scanned them in and edited it all on photoshop.. ahhh!


blogger template by lovebird